How to Write a Novel in Obsidian
A simple workflow which supports you from initial idea to first draft.
To write a story, from the initial shaping to a scene-by-scene to a full draft, we want any tools we use to get out of our way.
We want them to let us build up our story with nothing to distract us from the work.
Here is a simple workflow in Obsidian which shows the different story creation steps; from carding a story, writing a scene-by-scene, to writing the scenes/chapters.
I’ll show what you can do with Obsidian for this task, out of the box. It works for novels, screenplays or non-fiction. I’ll also discuss the Longform plugin. What makes this post different to other guides is that it I write about the writing workflow as it relates to the tool.
It suits a particular way of working, coming up with ideas for scenes, working on structure, building a scene-by-scene, writing out full chapters. If you like blast writing, just starting and going for it, you might be as well working in a word document.
The pillar post for this series on writing in Obsidian is An Introduction to Obsidian for Writers. There are also posts on organising your Obsidian notes, publishing your vault and A Zotero to Obsidian Workflow.
In this post:
- Getting started with Obsidian for Longform Writing
- Carding a Story Digitally
- Obsidian Graph View for Carding a Story
- Changing Cards into Notes
- Creating a Scene-by-Scene in Obsidian
- Writing out your Full Scenes or Chapters in Obsidian
- Using Tags when Writing Longform
- Moving Your Work to a Document Editor
- A Note on Obsidian Community Plug-Ins
- Installing the Obsidian Longform Plug-in and its Functionality
- Video Walk-Through of Obsidian Canvas and the Longform Plug-in
Getting started with Obsidian for Longform Writing
I would suggest creating a new Obsidian Vault for your longform story.
I recommend this to minimise distractions. In a fresh vault - the list of notes are just your scenes or chapters.
If you need to pull in research/other notes, you can make duplicates in the folder they live in and drag them into your new project vault folder. All the files live on your desktop in markdown format (you'll find a downloadable cheat sheet for Markdown commands at this link).
And if for any reason you want to keep all your work in one vault, you simply drag the folder into your main vault on the desktop.
Carding a Story Digitally
I’ve written about carding a story here. Physical pen and paper (cards) is a great way to do it. It is immediate, you can move things easily, scribble down any random thoughts…
But backing up is difficult. What if you take your box of cards to a café and lose them? So this is one argument for having a digital system for this.
Writing in Word is ok but you’re scrolling around and cutting and pasting and where was that section again and oh no I’ve forgotten the act three climax.
You could do it Final Draft but it’s a bit clunky.
Obsidan Graph View is pretty good for carding, though.
Obsidian Graph View for Carding a Story
Graph view has everything you need to get that good carding vibe going.
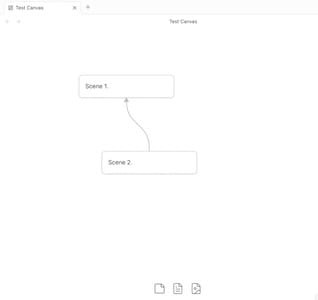
You can :
- Create cards easily, move them around and adjust their size.
- Hover over a card until you see the wee hand (there card shouldn’t be highlighted), then move them around.
- Hover over a card, grab the wee blue circle that appears and drag it to another card. A cool little linking arrow appears.
- To get rid of the arrow, click on the head of the arrow and disconnect it, and it disappears. You will feel all powerful doing this, like taking that bejewelled glove off Thanos.
The linking arrows do not carry across when you convert the card to a notes. But inside the card you can type two square brackets and it helps you autofill the names of existing notes, between two square brackets on either side - which looks like [[note]]. Or you can create a new note by typing and the colour of the text is a little paler as a reminder.
If you want to change which note you’re linking to, it all updates as normal.
Changing Cards into Notes
You can turn a wee card into a note by clicking on it and chosing “convert to file”. It then appears in your list of notes on the left.
And the middle icon at the bottom - “drag to add note” allows to you chose an existing note.
The downside. You only have so much screen real estate and it can get a little full. But, pretty cool.
Creating a Scene-by-Scene in Obsidian
I’m calling it a scene-by-scene, it’s just an expansion of your initial kernel of an idea - whether it is a screenplay or a novel.
So you’ve got a good idea of the flow of a story. You’ve converted all the cards to notes and linked them as you want - scene 1 to scene 2 and so on. This isn't a linear process, as you write out scenes, the order can change, you may go in a totally different direction, it's iterative.
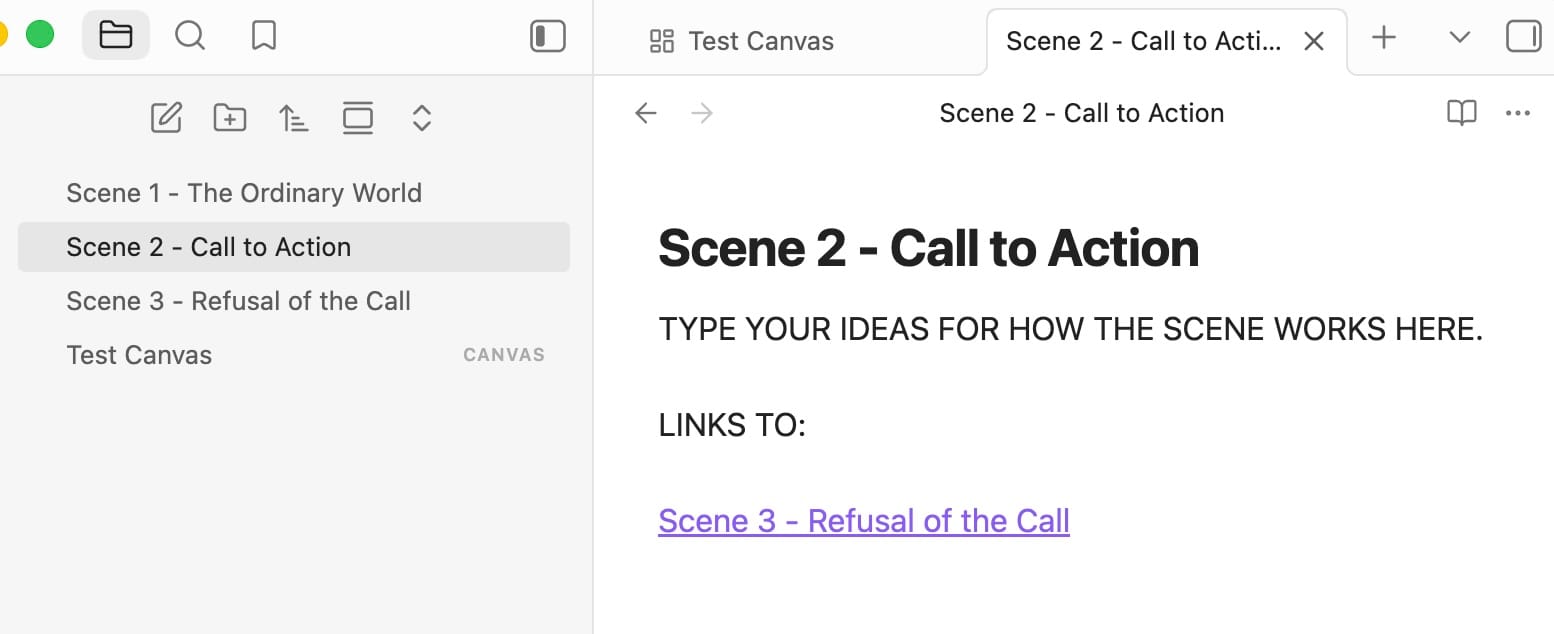
In Obsidian out of the box, you can’t convert cards to notes in bulk. There are plug-ins which help but I try and avoid plug-ins where I can. And things like this don’t take long, and it means you spend more time thinking of your story.
You’re still not writing the full prose or dialogue, you’re still working on the story in miniature. This saves a lot of time down the road.
I do like blast writing myself, as well. Starting off and then piling into into a story and figuring it out as I go along.
But there’s something to be said for this workflow. You get the structure in place, then write the piece.
Obsidian is great for this. You can go quickly between scenes, you’re making unexpected and exciting links in your story, you can slot things in no problem, everything updates.
So then you have your novel or screenplay in miniature.
Make a backup of your vault at this point, so that you always have a clean copy of your scene-by-scene. Back-up your files regularly. Your work needs to be in at least two places, and not in one geographical location.
Writing out your Full Scenes or Chapters in Obsidian
If you’re working on a screenplay, I’d move to Final Draft to do the actual writing.
Now we’re into first draft territory. This is up to you how you want to go about it. This is how I would do it.
I wouldn’t duplicate notes, that way I can navigate quickly through all the scenes in the panel on the left.
I would keep a short summary at the top and then write below. I’d keep the scene-by-scene in the note as it’s what is guiding my writing.
Then it's just you and the writing.
Using Tags when Writing Longform
You could use tags, for example, for tagging which characters are in a scene. Then you can easily search in the tag menu on the right.
Or you could use them as structure guides i.e tag a scene as "1.inciting incident" and you can see how your structure is building up.
Moving Your Work to a Document Editor
So the first draft is finished. At his stage I would copy and paste all the text into a Word File or a Mac Pages document.
After the amount of work it takes to write a novel, copying and pasting your writing into a document editor like Word takes no time at all.
It has to happen sometime, in order for you to be able to share it with people.
However, there is a community plug-in which makes this process faster, if you want to explore it.
A Note on Obsidian Community Plug-Ins
I try and avoid community plug-ins, although many people love them. The reason is, I want Obsidian to be as simple as possible to use.
Also, Obsidian doesn’t take responsibility for these plugins, it isn’t involved in keeping them up to date, making sure they work with any new releases, and so on. If I build my workflow on one, what if one day I wake up and it doesn’t work?
I also haven’t got a good handle on the data implications. I don’t know the developers either. But I do admire the work they do in order to give users more functionality in Obsidian.
Anyway, please be careful when downloading software to a computer where your very hard earned writing lives.
Installing the Obsidian Longform Plug-in and its Functionality
This is how to install the Longform plug-in. In the main menu - Obsidian: Settings: Community plug-ins. I have created a video walk-through (below) of carding in Canvas and the Longform plug-in as there are a couple of fidgets thing.
You may have to exit restricted mode. Search the plug-ins and find the Longform plug-in. At this stage I share a screen grab with Gemini to check I have the right one.
Go through the steps of installing and enabling it.
So then it takes you through the steps for using it. You create a folder in your vault. Go back into the main Obsidian view (on the left) and right click. Create a Longform project.
You work in the Longform sidebar pane, not your usual Obsidian file explorer.
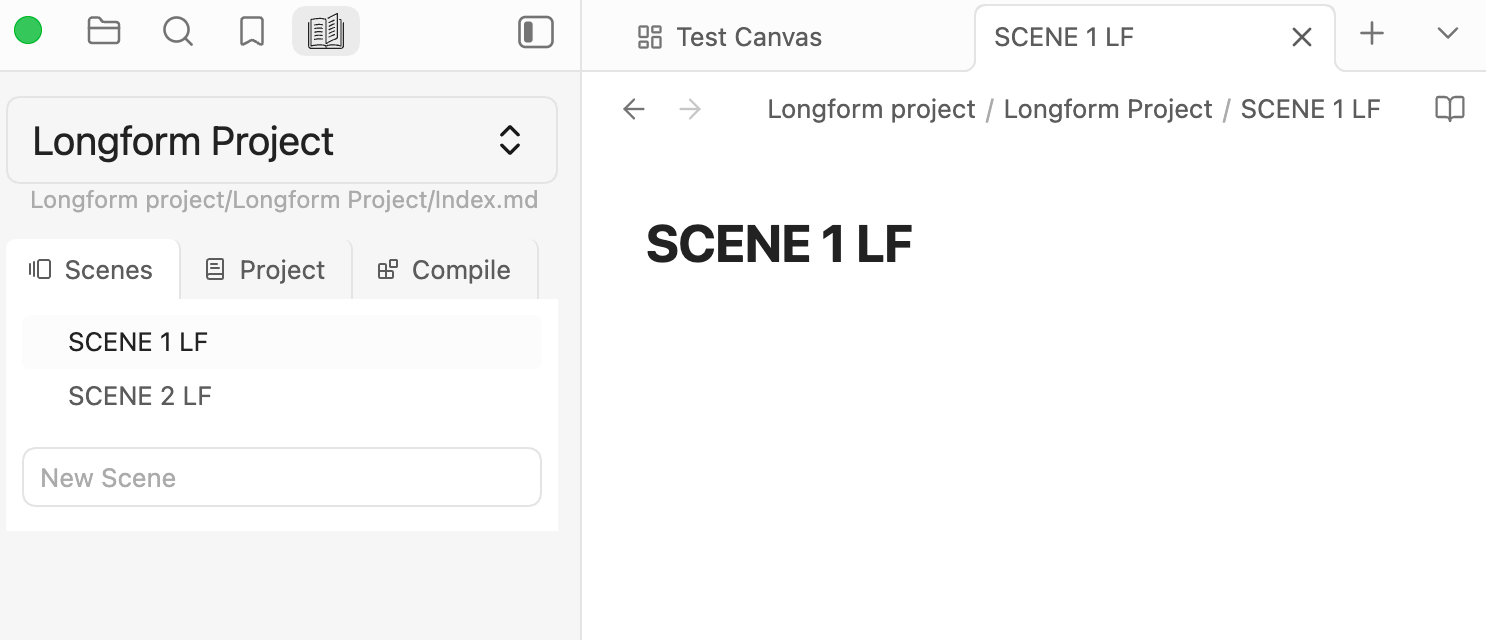
Key functionality includes:
- The scenes tab where you create and work on your scenes.
- The project tab where you can organise project metadata, track word counts and create new drafts (which is admittedly pretty handy)
- The compile tab where you choose what you want in your compiled version of the text.
If you're interested in using it, I would suggest enabling it and doing a test project to get used to it.
Video Walk-Through of Obsidian Canvas and the Longform Plug-in
I hope this helps with your writing workflow in Obsidian and thanks for reading.